Spend less time on your laptop! Make post-production faster and more fun with our step-by-step tips for batch editing in Lightroom.
Cut Your Photo Editing Time in Half!
We all love the end result of post-production, but there aren’t many photographers who truly love the grueling work of the digital workflow. Dumping, culling, selecting, color-correcting, retouching… it’s easy to spend more hours in Lightroom than you invested into the shoot itself.
We reached out to Cole from Cole’s Classroom, a total Lightroom wizard, who shared some must-know insights for making your post-production faster and more fun with batch editing!

Brooke Cagle
Lightroom or Photoshop?
The number one reason to use Lightroom over Photoshop is editing speed and organization. Photoshop can’t compete in any of those areas. Conversely, there are things that Photoshop can do that Lightroom cannot. When you want editing precision and control—that’s what Photoshop is for.
But keep in mind, the software isn’t just an editing program. It’s an image management system that will keep things nice and tidy for you.
Lightroom works best for:
- sorting through your images and picking the keepers (culling)
- batch editing images quickly using presets, or batch editing many photos at once
- organizing multiple photo shoots
- easily locating previously-taken photos
- creating slideshows or designing books/albums

Brooke Cagle
Advice for Lightroom Newbies
Don’t be afraid! It’s actually a very intuitive program once you get in there and start experimenting. Lightroom is not a “nice to have” program, it’s a “must-have” solution, so don’t let yourself get intimidated and give up!
Devote a little time to exploration, and don’t be afraid of joining a Lightroom training course if you want to learn quickly. You’ll be editing your next shoots so much faster, you’ll easily recover any effort and money invested in training.
Are You Ready to Cut Your Workflow by 50%?
Without a doubt, the easiest way to chop your photography workflow in half is by using one-click presets to automate 85-90% of the basic work. This allows you to focus the bulk of your time on the final 10% of the editing: the finer details that really define a photograph as yours.
“I remember taking 24 hours on average to edit each wedding,” admits Cole. “That wasn’t fun at all, and it cut into my profits big time! Now, I only spend 4 hours editing per wedding. Presets, combined with smart batch editing, do the trick every time!”
#ShootProofPRO Tip: Use Presets to Save Time
Cole has developed a series of Lightroom presets you can download for FREE!
Smart Collections: The Lightroom Trick Most Photographers Aren’t Even Using
Smart Collections in Lightroom are a HUGE time saver anytime you want to quickly pull in a grouping of photos from all different folders. However, Smart Collections are only as “smart” as you make them. They rely on your photographs’ metadata, as well as the keywords or ratings you’ve applied to your images. (For maximum impact, don’t forget to add keywords and ratings to your photos!)
Smart Collections are particularly useful for updating your portfolio. With Smart Collections, I can easily review my favorite wedding images by category (Bride, Ceremony, Reception etc.) and date range, and within seconds it’s all done for me.
Anne Simone
How to Batch Edit in Lightroom
Cole mentioned batch editing above, and he is so right: this is a huge timesaver! Because of that, we’re outlining the steps to successfully batch edit in Lightroom. Implement this into your editing workflow and save hours!
There are a few different ways you can do batch editing, so we’ll walk through the options and you can choose which approach works best for your workflow.
Option #1: Apply Your Lightroom Preset on Import
Presets enable you to apply frequently used adjustments and edits to pictures, instead of manually post-processing each image. One of the simplest ways to batch edit is to apply a preset during import to multiple photos.
Step #1: Find the Images to Import
Search for the photos you want to batch edit and drag them into Lightroom while you’re in the Library module. As you select images to import, be sure that they are all pictures that you want to apply the same preset to.
Step #2: Apply the Preset During Import
Go to the right panel in the import dialog, then click the Apply During Import module. Under Develop Settings, choose the preset you want to automatically apply to the photos as they import into Lightroom. This will automatically apply the preset as you import multiple photos in Lightroom, saving you a ton of time customizing edits to each image!
“The downside to this method is that you can’t undo the action after you import photos,” Cole points out. “If you want to change presets, you’ll have to delete the photos and start over.”

Jason Strull
Option #2: Apply Presets in the Library Module
If you don’t want to apply presets during import because you want the ability to different presets for varying lighting conditions, poses, or scenes, batch editing in the library module is your best bet!
Step #1: Select Photos in Lightroom and Apply Preset
In the Grid View within the Library Module, select all of the images to which you want to apply a certain preset.
Look for the Quick Develop panel and click on the drop-down menu under Saved Preset. After choosing the preset you want to batch edit photos with, Lightroom will update the settings on all of your selected photos.
#ShootProofPRO Tip: Do You Know About the Painter Tool?
Select the little spray can icon to use the Painter tool. This empowers you to apply a preset or other custom settings to a bulk collection of images that you highlight in Grid Mode. Learn more about the Painter tool HERE!
Step 2: Continue Applying the Preset
Apply your preferred preset for each pose or scene as needed.
Similar to the first technique, this method doesn’t have a preview option, so carefully choose the preset you want to use. If it’s not working or you’ve made a mistake, you can undo it by going to Develop settings and clicking on Reset. You can also use the keyboard shortcut Command + Z (or Ctrl + Z for PCs.)

Brooke Cagle
Option #3: Sync Your Adjustments in the Develop Module
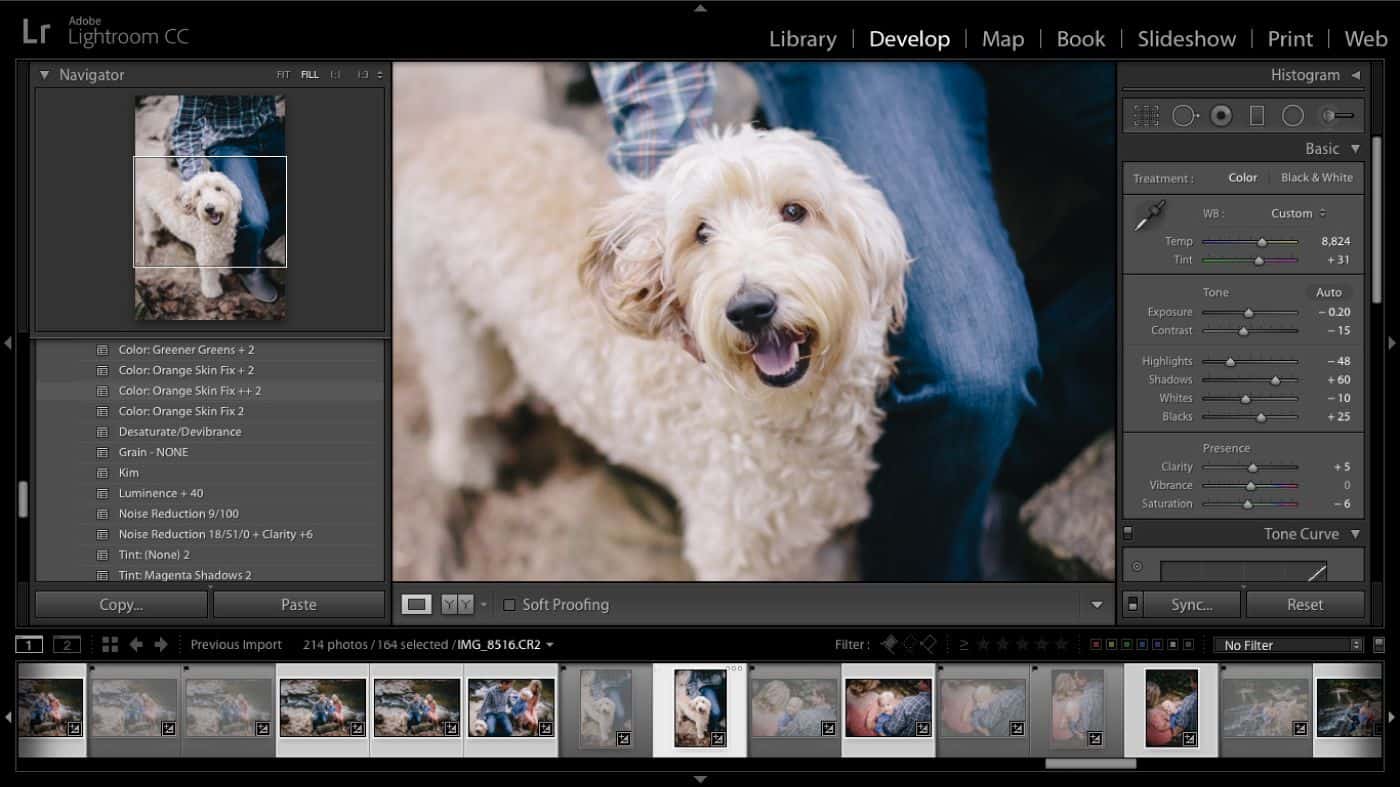
When batch editing in Lightroom, you can also sync specific adjustments you’ve made to the images while working in the Develop Module. Syncing your photo settings works well when you want to sync more than just a preset across multiple images. If you’ve made multiple adjustments to an image using various tools and sliders in the Develop Module and you want to apply batch processing to several photos, syncing is the way to go.
Step #1: Edit an Image
Make your Lightroom edits to a photo using the Develop Module. This may include adding a gradient filter, using the adjustment brush, or changing the white balance.
Step #2: Select Images and Apply the Same Edits
In the Develop Filmstrip view, select the photos to which you want to apply the same edits. Typically, you will want to select images that have roughly the same lighting conditions as the first image you edited.
Step #3: Sync to Batch Edit Photos
Click Sync, and from here, a settings box will pop up. Check the options or edits you want to sync across all of the images selected. Then, click Synchronize and watch your photos “magically” update with your synced preset!
“Once the edits are applied,” Cole reminded, “you can quickly go through those photos in Lightroom and make any tweaks necessary.”

Brooke Cagle
Option #4: Use Automatic Syncing
While the Sync feature is a great way to batch edit photos in Lightroom, you may have to synchronize an image again if you need some extra edits done to images. If you want to update the batch as you work on a picture, it would be better to use the auto sync method.
Step #1: Choose Your Photos
Unlike Sync, you won’t begin by working on the first picture. Rather, you’ll need to select all of the photos in the series in the Develop module.
Step #2: Make the Edits
Turn on Auto Sync by clicking on the little switch next to the Sync button. This should display your first selected photo in full view so that you can edit in detail. While you edit, the software will apply the edits for all chosen photos that you want to batch edit. Make sure you have a computer or laptop that can handle photo editing software; otherwise this can create a bottleneck on your computer.
“If you make a mistake,” Cole explains, “you can quickly correct it by readjusting the edit tool or going back as you normally do when working on a photo.”
Practice Makes Perfect!
Whether you’re dealing with a handful of images or thousands of photos, learning how to batch edit in Lightroom lets you create a retouched look with just a few clicks. Practice one or all of the techniques until you find the best method to improve your photography workflow!
#ShootProofPRO Tip: Now Learn About Smart Collection in Lightroom!
Check out Cole’s FREE detailed tutorial on smart collections now!
Written by KRISTI KVENILD and ANNE SIMONE | Photographs by ANNE SIMONE, JASON STRULL, and BROOKE CAGLE | Featuring COLE’S CLASSROOM

